The influence of art is far-reaching, and the extension of its relevance seems to be growing every day. There are so many different art forms in different places all over the world. Each of these art forms has many different branches, which makes art even more complex and diverse. Within the beautiful chaos that is art and craft lies the art of diamond painting.
Diamond painting is a combination of paint by numbers and cross-stitch. It’s considered to produce some of the most visually dazzling works and exciting mosaic pieces. Diamond painting originated in Asia and has grown to become a very popular creative outlet for many people around the world. The following is an exploration of diamond painting as an art and craft that’s becoming a worldwide sensation.
Kit And Tools
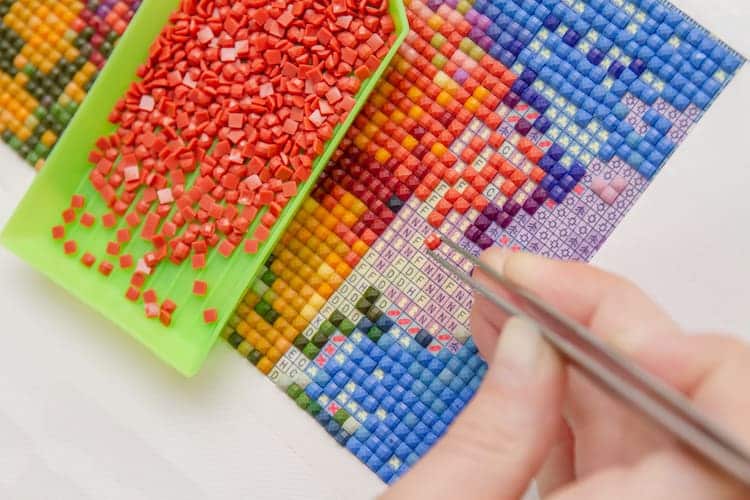
During diamond painting, you apply lots of sparkling resin rhinestones using an applicator. This is done on an adhesive color-coded canvas painting one by one. Below is a description of each of the tools required to carry out diamond painting.
1. Canvas
A canvas is a strong, woven cloth that artists use to paint. It’s a platform where the diamond painting is done. If you’re relatively advanced, you may want to look for a large square canvas to allow room for more creativity and complexity. However, if you’re a beginner nearing the intermediate level, you may want a smaller square canvas. There are numerous designs for all tastes and moods out there, so you can make use of your canvas in many different ways.
2. Adhesive
When people want to stick things together or stick an item into another object, they make use of an adhesive. Adhesives are also a very important aspect of diamond painting. In doing this art, the sparkling resin rhinestones are stuck into the canvas in creative ways to produce a piece of art.
3. Applicator Pen
An applicator pen is a vessel through which the diamond beads are carried from your tray to the canvas. Applicator pens may also be referred to as drill pens, and they allow diamond painting to be done more quickly and seamlessly.
4. Resin Drills
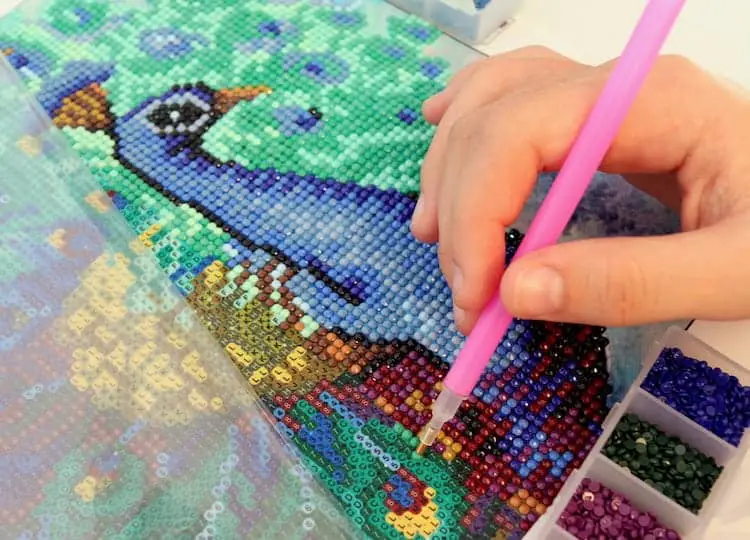
Resin drills refer to the diamond beads you place onto a canvas when doing diamond painting. There are two types of resin drills: square diamonds and round diamonds. Each type has its pros and cons, so pick which one is best for your creative piece.
5. Tray
You also get a tray in your diamond kit. The drills or diamond beads are poured into this tray and then shaken gently. After they’re shaken, it’s likely that the drills end up with the right side up in the notches within the tray.
How To Diamond Paint
Once you’ve gathered your kit and a few extra tools, you may now begin your diamond painting. This exciting hobby may be one of the best at-home crafts out there, so to help you start with your diamond painting, here’s a step-by-step guide you can follow.
1. Unpack Your Kit And Lay Out Your Canvas
The first thing you should do is unpack your kit. Make sure you’re clear about all the items in the kit so you’re able to use everything correctly. Having everything laid out may give you some inspiration if you’re having a creative block.
But before laying out your canvas, make sure the surface you place it on is clean. Also, it’d be much easier and more rewarding if you lay out your canvas on a flat surface. If you want to avoid bumps and disproportionate layers, try to look for the best possible smooth surface you can use.
2. Choose Your Diamonds
There’s an array of diamonds to choose from, including round diamonds, square diamonds, diamonds of different colors, or diamonds with patterns. So your next step is to pick which diamonds you’re going to use for your design in particular. Once you’ve chosen your diamonds, place them into the tray and shake lightly so they shift upright.
3. Apply Adhesive To The Tip Of Your Applicator Pen
The diamonds won’t stick to the canvas if there’s no adhesive or wax available. This is an important step in diamond painting. However, make sure you don’t put too much adhesive on the applicator pen as you might end up having too much of it on each resin drill, which could be messy.
4. Place Resin Drills On The Canvas
The last step is to place your resin drills onto the canvas. Make sure they stick well. If they don’t, you could add more adhesive or use a much stronger one. Do this repeatedly until your creative piece is complete.
Get Started With Diamond Painting
If you were looking toward adopting a new hobby or trying out something new, this could be a good place to start. A diamond painting could be one of the best gifts for crafty kids or a nice addition to your wall. There are many upsides to diamond painting, and understanding it could draw you closer to your creative side.
